Setting up Document Management
NOTE: The Triaster Process Library Document Management feature only supports Word (.docx) and Excel (.xlsx) files.
To use Process Library's document management features you need to:
- Ensure all files have Version and Document Number field codes. Please refer to Creating Version and Document Number Field Codes below.
- Move all modified files to the Library's Sandpit Documents folder.
- Create a bulk import file - an Excel spreadsheet containing document information. This file must be named ExcelImport.xlsx with the active tab named Docs. Save this to the Library's Sandpit Documents/MassUpload folder.
- Import and validate the files.
Creating Version and Document Number Field Codes
NOTE: These instructions refer to Microsoft Word & Excel 2010. The procedure may be different in other versions.
To achieve version control, Triaster's document management features require Version and Document number properties to be present in each document. We recommend that you create a template document and spreadsheet which both contain a Version and Document number field. To add these to a document:
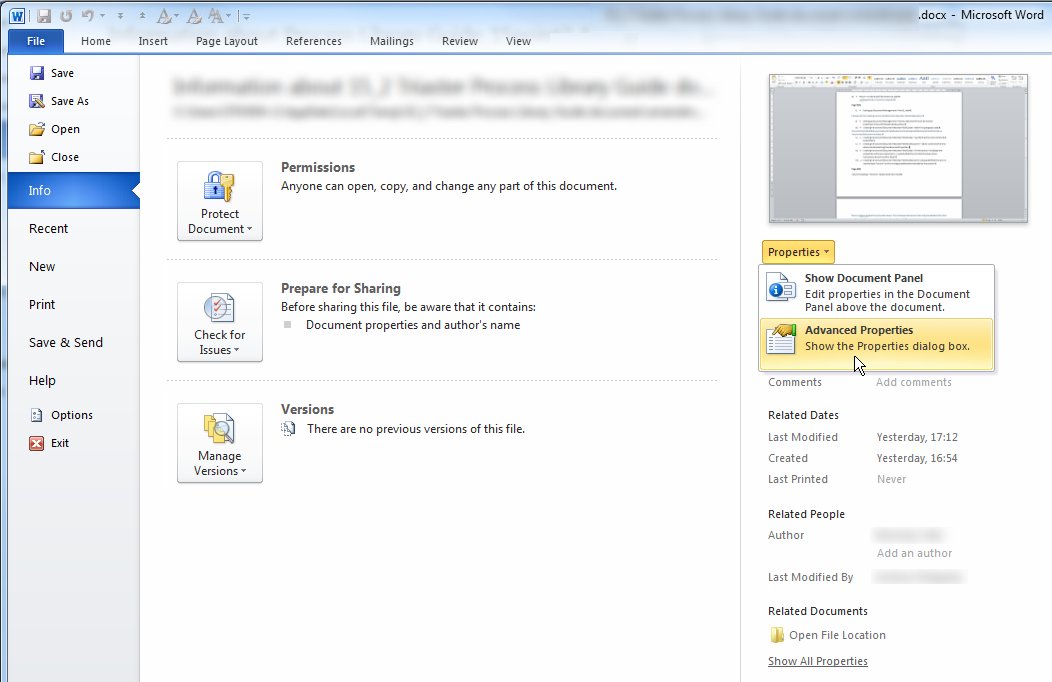
- Click the File tab.
- Click Info.
- Click Properties, and then select Advanced Properties.
- Click the Custom tab.
- In the Name box, type Version.
- In the Type list, select Text.
- In the Value box, type the required integer value, for example 0.
- In Microsoft Excel only, click on the Add button.
- Repeat this procedure to create the Document number property giving it an integer value, e.g. 0.
- Click the File tab again to return to your document.
- Save the document.

To display the properties within your Word documents, add them to the cover page or document header or footer.
- Place the cursor at the position where you want to display the property.
- Select on the Insert menu.
- In the Text section, click on Quick Parts.
- Select Field.
- Select Document Information in the Categories list.
- Select DocProperty in the Field names list
- Select Document number (or Version) in the Property list.
- Click on OK.
Import File Structure
The next step is to create a bulk import file named ExcelImport.xlsx - an Excel spreadsheet containing document information. Save this to the Library's Sandpit Documents/MassUpload folder.The import file must have the following structure:
- The active tab must be named Docs.
- The first line must contain the column headings listed below. The order of the columns can change but heading text must be as specified (apart from pre-approvers, see below) otherwise the column will not be imported.
- Only new document records will be created. If a document record exists (as identified by the name), it will not be overwritten.
- If any of the validation checks below fail, no import will be done and a list of errors will be displayed.
Column Headings
| Heading | Explanation |
| STATUS | One of the following values: New or Approved. You can only import documents at the start or end of the approvals process so the following status values are not valid: Pre-Approval Required, Pre-Approved, Rework Required, Approval Required, Review Required, Reviewed. |
| NAME | Full path and filename to an existing file. Mandatory field. |
| CONTENT_APPROVER | Valid approver email address. Mandatory field. |
| REVIEWER | Valid reviewer email address. Mandatory field. |
| AUTHOR | Valid document author email address.Mandatory field. |
| PRE_APPROVER x | Variable number of columns, must have column heading containing "PRE_APPROVER", must be a valid approver email address |
| DOCUMENT_TYPE | Valid document type |
| APPROVAL_DATE | Valid date |
| REVIEW_INTERVAL | Whole number of months |
| LAST_REVIEW_DATE | Valid date |
| NEXT_REVIEW_DATE | Valid date |
| CHANGE_DATE | Defaults to today's date |
| CHANGE_DESCRIPTION | Any Text |
| CHANGE_DESCRIPTION | Any Text |
| COMMENTS | Any Text |
| BUSINESS_AREA | Any Business Area. |
| BUSINESS_FUNCTION | Valid business function |
| VERSION | Integer value, defaults to 0 |
| REVISION | Integer value, defaults to 0 |
Importing Documents
- Set up the import spreadsheet and locate all documents correctly as described above.
- Log in to the Approvals page of Process Library.
- In the Document Management section, click on Manage Documents.
- Click on the Mass Upload button (requires Admin privileges). The server validates the documents in the Sandpit Documents folder against those listed in the ExcelImport.xlsx file located in the Sandpit Documents/Mass Upload folder. If any errors are encountered, the import action is aborted.
When the process is completed, all imported files and their properties are tabulated as shown below:

With large document lists, you can apply filters to view only those documents of interest.
Technical Requirements to Enable Document Management Feature
To enable the Document Management feature, a number of changes need to be made to the Settings.xml file. This should only be done under the guidance of a Triaster Support Consultant as any accidental changes MAY take your Process Library out of use
Within the library you are updating the following code needs to be inserted
<DocumentManagementURL> http://[Servername]/ProcessLibraries%202011/[LibraryName]/live/Documents/</DocumentManagementURL>
<DocumentsPath>C:\Triaster\TriasterServer2011\MapStore\Equifax\Live Documents</DocumentsPath>
|
Triaster Limited www.triaster.co.uk |